 |
DIY • Do it Yourself • Weekend Projects • BIG Projects • LITTLE Projects | |||||
|
DIY • Do it Yourself • Weekend Projects • BIG Projects • LITTLE Projects | |||||
How Do I Share My How-To?It's really pretty easy, pictures and videos of the steps it takes to complete your project are stored on YouTube and picasaWeb. Once your "final" video is stored on YouTube, your project will show in the listings on the site. All this is controlled by our Creator's Tools. Basically, you start a project by writing up the project idea. Step 1. Sign up for a free Creator's Account to gain access to the Creator's Tools. Step 2. Login Step 3. Push the "Create New Project" button on the Creator's Tools. Make a name (you can change it later) for your project. And describe your plans to use as notes to guide the creation of the steps. Step 4. When you've finished providing all the steps to your project, shooting the videos and saving to google video via the Creator's Tool Panel, you are ready to write the introductory paragraph with an interesting story of how you did it, or how you do it in the case of a professional services presentation. Step 5. Last but not least create and upload the video (to YouTube) which is the video that will be used to summarize the project. If you were building a robot, this final video would show the robot running around, doing fun things that will inspire others to create their version of your project. That's it... Watch the views and ratings for your project pile up along with the sales commissions! Or get a customer because you showed how you remodel a house. |
FAQ About Becoming A CreatorQ. Why would I go to all that work, building something, then put it on a website like C What I Can Do? What's the point? A. Actually, there are a couple of forms for a reward:
|
Build Your Own Track Drive Robot ... 32042 Views Author's name: WeRbots Describes how to "build one of these" yourself. Pretty much is a step-by-step guide to build your own track drive robot.
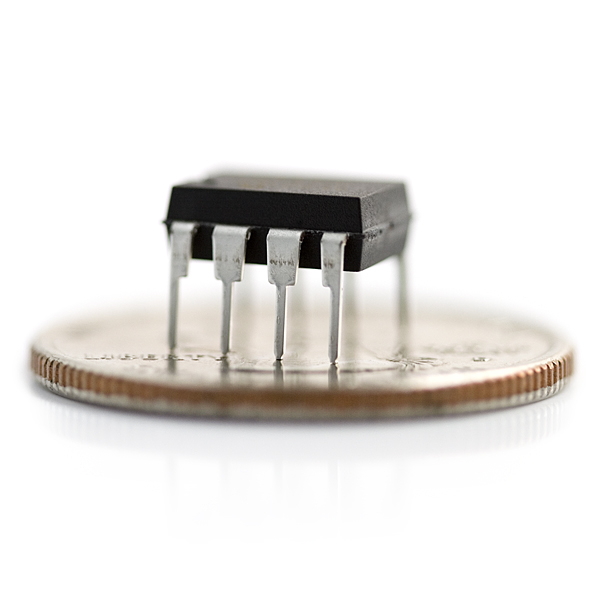
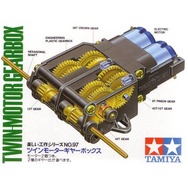
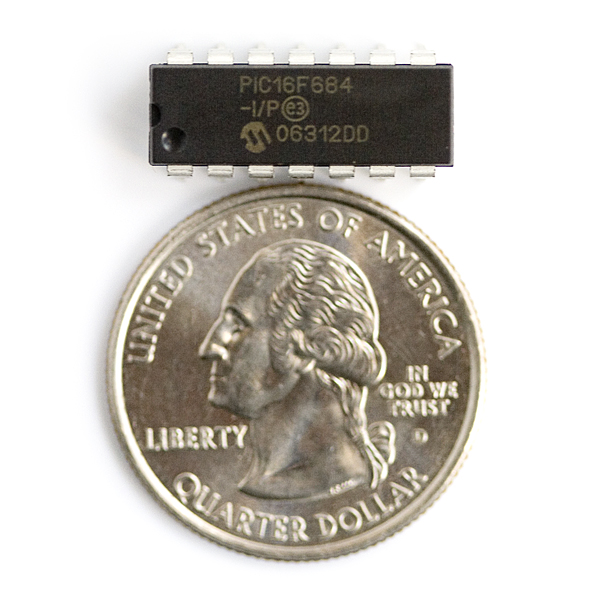
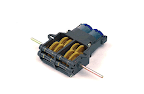
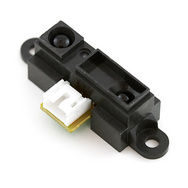
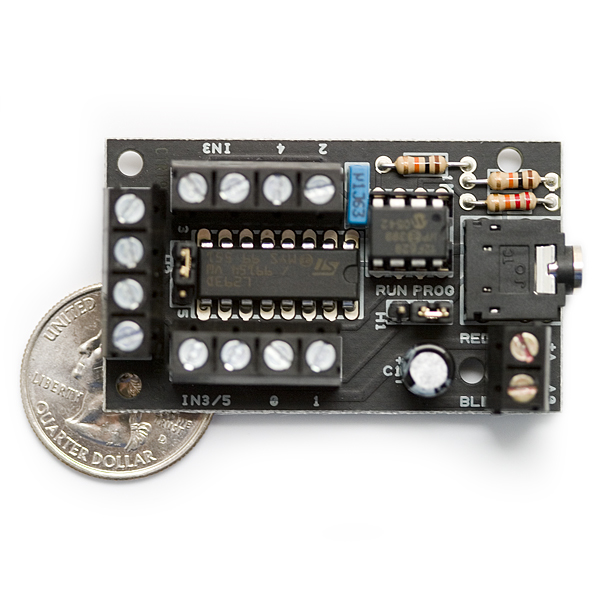
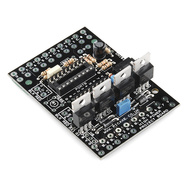
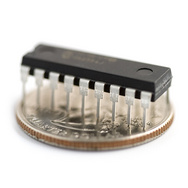
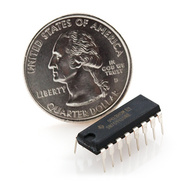
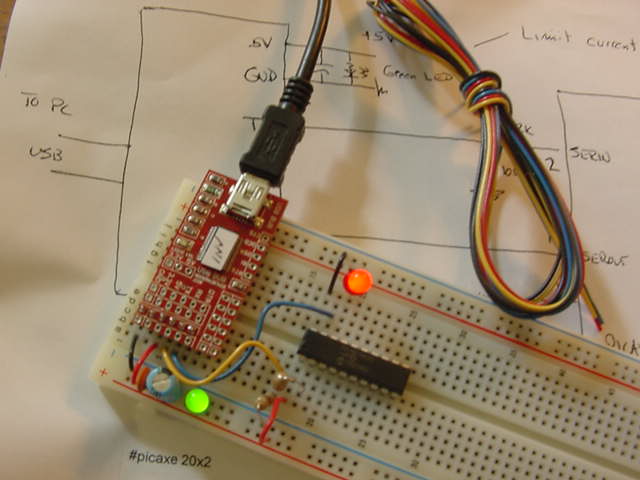
It is pretty simple and relatively cheap and actually kind of a fun way to become familiar with Robots and Robotics in general. It isn`t long after getting your first robot, you start to wish that little wheeled bot could climb over things in a relentless forward motion - - Like a Tank! Even though the old timers told me I didn`t want the hassles of a track-drive robot, I knew it wasn`t true. I wanted one! I wanted it simple and cheap and programmable for fun! Author's Assigned Keywords: Robots track drive robot picAxe IR Detector Infrared Proximity Sensor (ad) Get One of These Get the Tamiya Tracked Vehicle Chassis Kit to start with. It's a kit, so it will make for good practice. If you can build it you end up with a little bot that moves backwards, forwards and stops at the flick of a switch. That may be all you want to do. You may decide you want a tracked robot by just playing around, then go out and get yourself a fancy commercial unit. I, on the other hand, didn't want to invest hundreds of dollars, but going forwards, backwards, and stopping wasnt' enough for me! No!!! I wanted to use dual differential steering. In other words, TWO motors. With two motors I can move both motors and in either direction. That means the trakBot can make spinning turns as well as going forward and backwards and stopping! Moving from one motor to two motors meant a slight upgrade. Another purchase... And One of These Tamiya Twin Motor Drive installation is easy and putting the motor together is easy too. There are instructions for assembling the motor here on CwhatIcanDo. Don't forget the grease! You will have learned to put grease in all the right places having already assembled one gearbox to build the base kit. You'll have to make new holes in the wood base of the trakBot to mount the wider twin drives. But, you'll see - They work great. The nice thing is the small motors don't draw too much current so the H-Bridge circuit built in works well, even when you use variable speeds. Add Motor Control The picAxe Motor Controller is ideal for controlling the trakBot. Things stay just a little hot to the touch running the motors at full on, full off type operation. For trakBot, I chose the lowest gearing in my twin motor gearbox, so top speed is still pretty slow, but it will climb things like crazy. When you buy your motor control, you may only get a straight 8 bit picAxe chip free with the board. That means, you'll have to buy another chip, because only the 8M variant has interrupts and we use interrupts in this design. You wouldn't have to use interrupts, you could constantly scan the signal from the IR detector. But using an interrupt works better and makes the bot run in interesting ways. Let There be Sight! Add an IR detector so your bot can identify objects. At least if they are within 30-40 cm from the bot. That's why you want to put the IR detector on the front of the bot slanted to the side. With the cone shaped output of the detector, you will be able to pretty much cover the whole front end of the trakBot, so it will be able to recognize objects more effectively. Basically using an IR detector instead of building your own, takes advantage of the optical system built in. This IR detector is not sensitive to sunlight, and, it "sees" black plastic which is very difficult for IR eyes anyway. So spend the money, the good IR detector will pay off in the end. Mechanics Simplicity is the key. Use the motor mounts themselves to hold the motor control pc board, and to hold the IR detector. I used solder tabs for that job... Just bend the solder tab, mount it against the twin motor drive by removing a screw, then putting the screw back in to hold the pc board in place. Yes, I only used 1 screw. To mount the IR detector, so I could lean it back from the front of the bot to allow the cone shaped sensitive area to cover the whole front of the bot. This way, you can use only one detector where normally you would mount one on each side so the output of the IR "cone" covers the other. Too expensive to buy another sensor, so I just leaned it back using a metal jumper from a large electrical connection. These things are handy, but any easily bendable bracket would work. On the top of the bracket, mount another solder lug as shown in the picture. Wiring Things Up - Electronics This is a sort of block diagram with schematic wiring in it. You can easily see how to hook up each motor, and where the output of the IR detector (and power and ground) hookup. I mounted an on/off toggle to the platform, and I use a toggle switch when I'm programming, just so I don't have to keep moving the jumper around. Programming is done with an optional cable (you can build one yourself). All the instructions for programming and wiring are available for free from vendors who sell the chips. The picAxe chip has a tiny BASIC interpreter built into the chip. That means you don't have all the instruction space in memory because of the space the BASIC interpreter takes up. But for the 8 pin chips, which are doing specialized work (like driving motors), you can't beat the simplicity and ease of reprogramming of a picAxe. So it's a great choice for the trakBot! Make Some Software Overview: The free BASIC Software that is available for free from picAxe vendors allows you to program the 08m to control the motors via the Dual H-bridge supplied on the PC board. The BASIC interpreter uses a slightly "laid-back" version of BASIC, so it won't do super-exciting math or anything like that. But BASIC does allow you to follow a process from beginning to end. For example - The robot, before moving forward by enabling the H-Bridge might check to see if there are any obstacles in it's way, if not, it might move forward. Since this process is sequential, it means if you move the bot a foot at a time it might not see an object put in front of it out of it's current range. Because it's only checking every foot of bot movement. That won't prove practical. So you could just loop around, enable the motor, check for obstacles, enable again, etc. Now the bot is "pulsing" it's way around. Motor 1 on, Motor 1 off, check obstacles. Then if no obstacle, do that for Motor 2, and so on. The problem is the time loop has to be short or else the bot will wiggle. One motor on, relatively (to the bot) long wait to check and see if it is going to crash. Not a bad way to run a robot, if the loop is fast enough, it will work well. But hey! There is a much better and simpler way to run a robot. Using Interrupts: The M8 let's you monitor one of it's pins for a low or high (you decide) and then forces the software program to jump to a certain point, perform a subroutine, the jump right back into the program again right where it left off even if mid instruction when the interrupt occurs. Look in the listing below to see how the INTERRUPT subroutine is operated. This is the subroutine where the bot decides to evade or continue. It happens whenever the IR detector hits the threshold voltage (a low, logic 0). It does this when an object appears in front of it. Thus the computer doesnt' have to loop around it's sensors all day. An interrupt, interrupts the logical flow to make that decision to avoid an obstacle. It turns out that even if the computer is executing a PAUSE (basically twiddling it's thumbs for a length of time you specify) it is subject to an interrupt. Thus, in the code below, the MAIN routine just PAUSEs for nearly a minute, then jumps back and PAUSEs once again forever. Unless an object comes into the IR detector's view. The interrupt routine in the example is not very sophisticated, it just stops backs up a little and turns right or left (depends on how you decided to wire the bot) then tries to move forward again. Except for a random number generator, the bot would simply be a simpler "wall follower" pattern. But it proves to be stimulating and is actually fun to watch. Wall Follower Listing... '------------------------------------------------------- ' ' picAxe MOTOR Control for 08m chip ' interrupts drive evasive tactics ' SOUNDS: Using 3-level A/D Converter output ' Created by: Jim Huffman ' Rev 0.1 November 11, 2007 ' Rev 1.0 December 02, 2007 ' Using the AXE motor drive combo board ' ' Rev 2.0 December 31, 2007 '------------------------------------------------------- ' ' Initialize System Wide Values ' ' Directives ' Select and initialize chipset #picaxe 08m ' this is: picaxe08 in the setup that ' comes with the board '#terminal 4800 ' ' System resources symbol m1 = 0 '(leg 7) symbol m1en = 1 '(leg 6)ADC1 symbol m2en = 2 '(leg 5)ADC2,PWMout2 symbol IRsense = 3 '(leg 4) symbol m2 = 4 '(leg 3)ADC4 ' (leg 1 Vdd, leg 8 = Vss, leg 2 = Serial In) ' ' Motor Control constants ' speed control symbol R = w0 symbol y = w1 symbol z = w2 symbol alrmCnt = w3 ' '-------------------------------------------------------- ' Code Blocks: ' init: ' set pins 0,1,2, 4 as outputs let dirs = %00010111 let pins = %00000000 'set outputs low initially random R pause 1000 ' Stop Motor gosub move_stop 'don't go anywhere yet pause 1000 ' setint %00001000,%00001000 ' ' main: gosub move_forward random R pause 100 goto main ' ' '-------------------------------------------------------- ' Move this baby OUTPUT 2 move_forward: let pins = %00010001 return move_backward: let pins = %00000110 return move_stop: let pins = %00000000 'kill everything! return turn_right: let pins = %00010010 ' return turn_left: let pins = %00000101 ' return interrupt: ' sertxd("The value of R is ",#R,13,10) gosub move_stop gosub move_backward pause 300 gosub turn_right pause 30 pause b1 'add a random spin around time gosub move_stop setint %00001000,%00001000 return Beyond the Basics What's next? The program I've included here is very simple. If you want more complexity, there is a picAxe 18x motor controller available, with the H-Bridge and a set of four high-power output lines. I've used one of those to drive the speaker. It's quite loud enough for a bot. The 8M is a dandy processor, but you can do so much more with them. And every experiment is just a simple download and test away. Like controlling the speed of the motor by using PWM (pulse width modulation) so you can have your version of the bot slow down when it sees an obstacle. Then you can use your own avoidance routine to make it go... Let me know how building this bot works out for you. I have had a lot of fun with this bot, and there has been only an occasionally track loss or any of the other horror stories I've heard about tracked robots. Don't believe 'em, a tracked robot is a great starting place for a robot hacker like me, and YOU... It's Easy To: C - What - I - Can - Do • Sign up - Get ID and Password• Plan and Create a Project That Someone Might Enjoy and May Even Want to Build• Link to your creation on your favorite social networking site or blog.• Become famous! Because your projects get a lot of Hits!
|
By Creators DoctorZoidberg: Converting a Flashlight to LED DoctorZoidberg: Home Project: MUTE TV Wearable TV Muter! DoctorZoidberg: Scare Crow - For Modern Gardens - Home Project jim: CwhatIcanDo Website jim: Tour This Website PaulSandin: Butler, a low-cost mobile robot base WeRbots: BEAM BOT: HexBug Exposed! WeRbots: Buggy Bot: Wire Frame Bot Body WeRbots: Easy Cheap Robot Weekend Project WeRbots: RFL Robot Out Of The Box Experience WeRbots: Robot Man: With Robot Demos WeRbots: Build Your Own Track Drive Robot WeRbots: Build a Robot In 5 Minutes WeRbots: i-Mon App WeRbots: How To Make A Virtual Robot in FLASH WeRbots: Droid From Motorola :: A Robot ? WeRbots: Robots Almost Anyone Can Afford WeRbots: How To Build a Robot in a Box WeRbots: picAxe 18m2 for robotics WeRbots: Build a Respectable Autonomous Robot WeRbots: On Line Neighborhood Watch WeRbots: Pong))))) WeRbots: Roboteer`s Guide to BeagleBone Black WeRbots: Autonomous Robot PVC "Pickup Truck" |
By Keywords Action Script 2: How To Make A Virtual Robot in FLASH Ajax: CwhatIcanDo Website Ajax: CwhatIcanDo Specs: RC2 Ajax: battle Android: Droid From Motorola :: A Robot ? Android: battle batting cage installation: Home Installation of a 4 Section In-Ground Batting Cage BEAM Robots: BEAM BOT: HexBug Exposed! BEAM Robots: picaxe 8m: Wall Follower Mouse gets Majorly Modded BEAM Robots: How to build simple analog balancing robots BEAM Robots: battle Block Watch Cam: On Line Neighborhood Watch Cheap Robot: Easy Cheap Robot Weekend Project Cheap Robot: How To Build a Robot in a Box Cheap Robot: Autonomous Robot Built From Power Chair Wheelchair commercial killer: Home Project: MUTE TV Wearable TV Muter! Convert Your Flashlight to LED: Converting a Flashlight to LED Create a Project: HELP :: How To Create a Project CwhatIcanDo HELP: HELP :: How To Create a Project Do it Yourself: Robots Almost Anyone Can Afford Do it Yourself: Scare Crow - For Modern Gardens - Home Project Do it Yourself: Wheelchair Works 3 Ways: Manual, R/C, and Autonomous Do it Yourself: On Line Neighborhood Watch Droid Smart Phone: Droid From Motorola :: A Robot ? Easy to Make Robot: Easy Cheap Robot Weekend Project entertainment: Home Project: MUTE TV Wearable TV Muter! FLASH Applications: How To Make A Virtual Robot in FLASH HELP: Tour This Website How To: CwhatIcanDo Website How To Build Cheap Bots: Robots Almost Anyone Can Afford How To Build Cheap Bots: How To Build a Robot in a Box How To Website: Tour This Website How To Website: CwhatIcanDo Website Infrared Proximity Sensor: Build Your Own Track Drive Robot IR Detector: Build Your Own Track Drive Robot Lighting Projects: Converting a Flashlight to LED logic analyzer: An affordable Logic Analyzer for the workbench. multi: Multi Media Messaging Device Mute the TV: Home Project: MUTE TV Wearable TV Muter! open source: An affordable Logic Analyzer for the workbench. picAxe: Build Your Own Track Drive Robot picAxe: picAxe 18m2 for robotics picAxe 08m: Robots Almost Anyone Can Afford picAxe 14m: picAxe 14m Motor Driver Board: Make Your Own picAxe 14m: How To Build a Robot in a Box picAxe 18m2: picAxe 18m2 for robotics picAxe 18m2: Weekend Project: Get Started With Robots picAxe 18m2: Build a Robot From A Power Wheelchair picAxe 18m2: Autonomous Robot Built From Power Chair Wheelchair picAxe 18m2: Wheelchair Works 3 Ways: Manual, R/C, and Autonomous picAxe 18x: How To Build a Robot in a Box picAxe 18x: picAxe 18m2 for robotics picAxe 18x: Build a Robot From A Power Wheelchair power wheelchair: Wheelchair Works 3 Ways: Manual, R/C, and Autonomous Quick Build Robot: Build a Robot In 5 Minutes RFL Robots: Building an RFL Inspired Upright Robot Base RFL Robots: RFL Robot Out Of The Box Experience robot bending: Morphibian Land Shark robot bending: Build a Robot From A Power Wheelchair Robot Man: Robot Man: With Robot Demos Robot Motor Control: Build the L298 H-Bridge Motor Control Robot Motor Control: Robot Basics Robot Motor Control: picAxe 14m Motor Driver Board: Make Your Own Robot Motor Control: Buggy Bot: Wire Frame Bot Body Robot Motor Control: picAxe 8 bit Motor Controller: Look Inside Robot Motor Control: How to build simple analog balancing robots Robot Motor Control: Build a Robot From A Power Wheelchair Robot Motor Control: Autonomous Robot Built From Power Chair Wheelchair Robot Pets: DogBot the Robo Dog : Robotic WatchDog Robot Pets: Operation of the Tri-Bot From Wowwee! Robot Pets: Robot Man: With Robot Demos robotics: Droid From Motorola :: A Robot ? robotics: Easy Cheap Robot Weekend Project Robots: BEAM BOT: HexBug Exposed! Robots: Robot Basics Robots: Buggy Bot: Wire Frame Bot Body Robots: Build a Robot In 5 Minutes Robots: Build Your Own Track Drive Robot Robots: Easy Cheap Robot Weekend Project Robots: How To Build a Robot in a Box Rumble Bot Conversions: Robots Almost Anyone Can Afford Security System: On Line Neighborhood Watch Select or type in a Keyword: Converting a Flashlight to LED track drive robot: Build Your Own Track Drive Robot Virtual Pet Robot: How To Make A Virtual Robot in FLASH web: CwhatIcanDo Website web 2.0 site: CwhatIcanDo Website web 2.0 site: CwhatIcanDo Specs: RC2 Weekend Project Robots: Easy Cheap Robot Weekend Project Weekend Project Robots: Weekend Project: Get Started With Robots |
Click To Expand / Contract Menus. View by Creator, Category, Keywords or Number of Views.